따배씨 강의를 듣고 CKA 자격증 준비를 하면서 접한 용어, 명령어들을 정리
- 강의
https://www.youtube.com/playlist?list=PLApuRlvrZKojqx9-wIvWP3MPtgy2B372f
[따배씨] CKA 시리즈
www.youtube.com
용어 사전
kubernetes는 짧게 k8s(첫k와 마지막 s 사이 8글자 수라는 의미로 사용됨)로 명칭하겠음
- ETCD
- k8s의 데이터 저장소
- api로 동작되는 k8s의 운영정보가 담겨져 있음 (key - value 타입)
- pod 형태로 동작하며, etcd pod가 k8s에서 운여되고 있는 모든 정보를 받아 저장
- /var/lib/etcd 위치에 데이터베이스 형태로 보존됨
- Backup
- ETCD를 백업한다는 의미로 Snapshot을 찍는다는 의미
- Restore
- ETCD 파일은 /var/lib/etcd에 저장되어 있는데 운영중인 파일이므로 restore할 때 해당 파일을 건드리면 안되므로 /var/lib/etc-rename 등의 경로에 restore한다
- 임시 복구한 파일의 경로를 etcd에 알려줌
- etcd pod는 static pod로 config만 변경하면 restart 함 (kubelet이라는 node의 pod 관리자가 수행)
- Context
- use-context 명령어로 context를 지정하는 것은 필수
- 현재 context 확인 명령어 `kubectl config current-context
- Namespace
- k8s의 single cluster에서 리소스 그룹을 격리하기 위한 매커니즘
- k8s는 초기 4개의 namespace가 존재
- default, kube-node-lease, kube-public, kube-system
- kubectl get namespace로 확인 가능
- kubectl
- k8s에서 api를 통해 cluster의 control plane과 통신할 수 있는 도구
- Pod
- API (kubectl)에 의해 생성되는 Pod
- 동작 방식
- master에게 kubectl 명령어를 통해 nginx pod 1개 생성 요청
- 요청이 master의 API server로 전달
- API server는 요청을 받으면 etcd에 저장되어 있는 클러스터의 상태 정보를 꺼내서 scheduler에게 보내고, scheduler가 pod 생성에 적합한 노드를 찾음
- scheduler는 시스템과 클러스터 상태를 확인하고 가장 적합한 노드를 선택해서 API에게 전달
- API는 노드에서 실행되고 있는 kubelet에게 nginx pod 실행을 요청
- 노드의 kubelet은 컨테이너 엔진에게 pod(컨테이너) 실행 요청 (각 노드에는 컨테이너 엔진이 있음)
- 컨테이너 엔진은 registry라고 하는 허브에서 nginx 이미지를 다운로드 받아서 실행하고, 실행된 상태 정보를 kubelet에게 전달
- kubelet은 그 정보를 API server에 전달
- API server는 현재 노드에서 nginx pod가 실행됐다는 것을 etcd에 기록
- Static Pod
- 노드의 kubelet에 의해 생성된 pod
- 파드의 이름 끝에 노드이름이 붙어있음
- API로 요청하지 않고 노드의 kubelet 설정파일(config.yaml)에 의해 static pod 파일 위치를 입력하여 생성
- kubelet 설정 파일 경로 - /var/lib/kubelet/config.yaml
- default static pod 경로 - staticPodPath: /etc/kubernetes/manifests
- pod.yaml을 만들어두면 노드에 pod를 생성한다 -> kubelet이
- 삭제하면 pod는 삭제하게 됨
- kubelet이 생성, 삭제
- master 노드에서도 마찬가지로 API, scheduler, etcd pod들을 static pod로 생성하는 것
- 노드의 kubelet에 의해 생성된 pod
- Multi-container Pod
- 한 Pod에 여러 Container가 존재하는 Pod
- Side-car Container Pod
- 하나의 Pod 안에서 두 개의 Container와 저장공간(Volume)이 같이 만들어져서 동작하는 Pod
- Nginx라는 Main Container를 동작시키는데, access log, error log가 /var/log/html에 쌓인다
- 해당 로그를 하나의 volume을 만들어 Mount 시키면 varlog라는 저장소에 로그가 쌓이게 됨
- 해당 볼륨에 쌓인 로그를 분석하는 Container를 만들고 하나의 Pod안에서 동작시킨다면
- 로그를 분석하는 Container가 Side-car Container가 된다
- Rolling Update
- 서비스를 중단하지 않고 업데이트하는 것 (Deployment)
- 새 버전을 배포하면서, 새 버전 인스턴스를 하나씩 늘려가고, 기존 버전의 인스턴스를 하나씩 줄여나가는 방식
- 새 버전의 인스턴스로 모든 트래픽이 이전되기 전까지 이전 버전과 새 버전의 인스턴스가 동시에 존재할 수 있다는 단점이 있지만 시스템을 무중단으로 업데이트할 수 있다는 장점이 있음
- 버전을 올리는 상황에서도 사용하지만 Rollback도 마찬가지로 지원함
- NodeSelector
- 특정 pod를 특정 node에서 실행시키기를 요청하기 위해 사용
- 특정 node에 label을 설정한 후 Pod 생성 정보에 NodeSelector를 설정하면 원하는 node에 pod를 생성할 수 있음
- Node 관리 명령어
pod 이름 끝에 노드 이름이 붙는 파드
// 현재 시스템의 노드 정보 확인하기
kubectl get nodes
kubectl get nodes -o wide

// 현재 시스템의 노드 정보 자세히 확인하기
kubectl describe node k8s-worker1

// 해당 노드에 Pod 실행되지 않게 하기
kubectl cordon k8s-worker1

// 해당 노드에 Pod 스케줄링 되게 하기
kubectl uncordon k8s-worker1

// 해당 노드에 있는 모든 Pod를 안전하게 다른 노드로 이동시키고 해당 노드를 비움(비활성화)
kubectl drain k8s-worker2	// error cannot delete DaemonSet-managed Pods
kubectl drain k8s-worker2 --ignore-daemonsets	// 데몬셋에 영향을 주지 않고 해당 노드를 비움
pod 이름 끝에 노드 이름이 붙는 파드
- NodePort
- NodePort Service는 서비스를 하나 만들어 외부의 어떤 Port 번호를 지정하여 붙게끔 하고, 내부의 어떤 Pod를 서비스할지를 Label Selector로 지정해주어 Target Port 번호를 정의하는 것

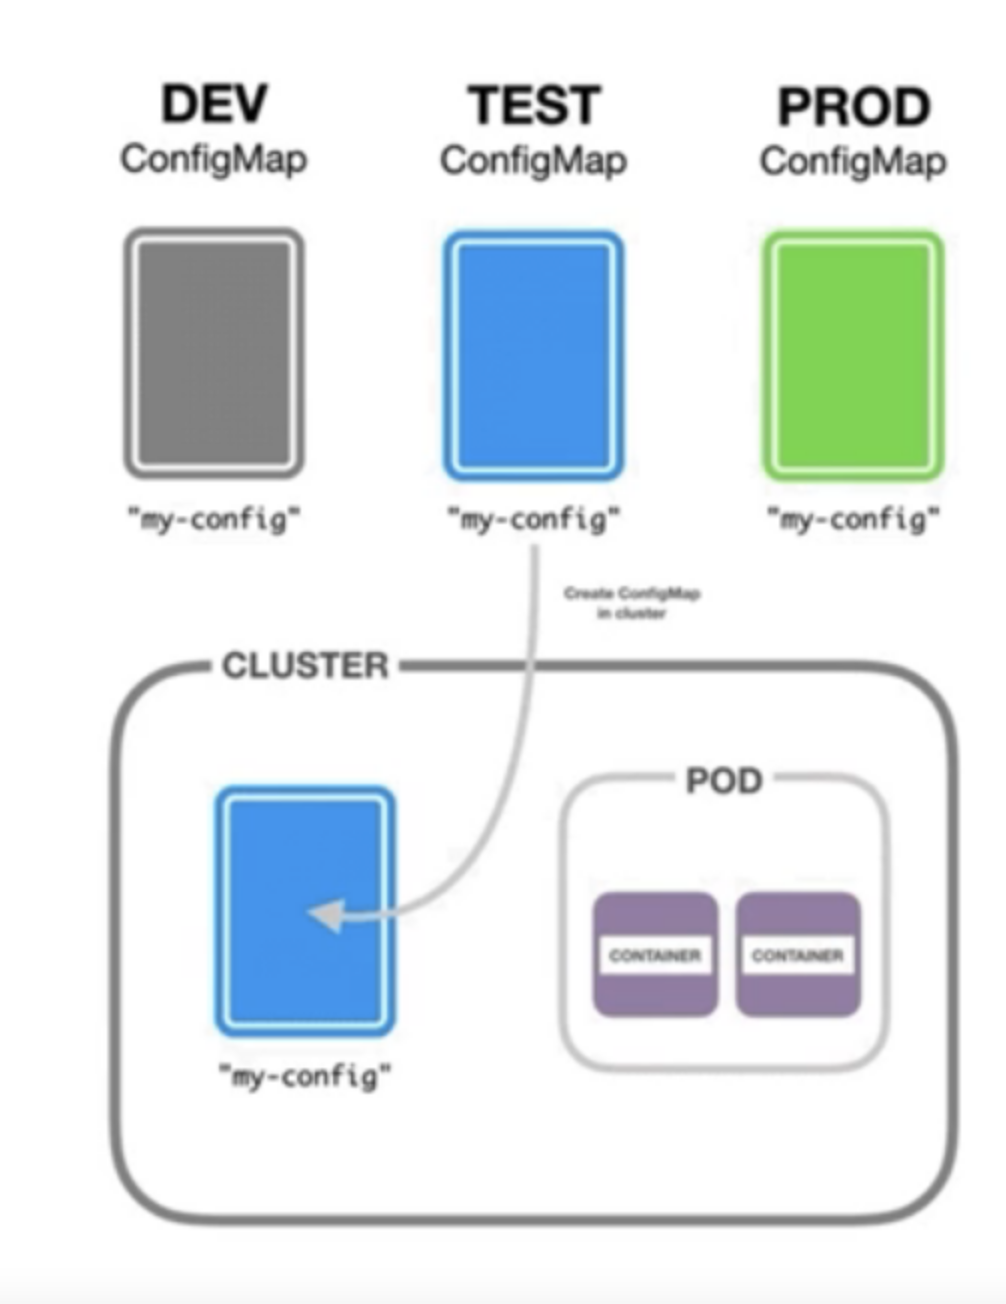
- ConfigMap
- Application에서 사용하는 config 정보를 통합 관리
- namespace에 ConfigMap을 apply하고 각 Pod에서 configmap을 매핑하여 원하는 데이터를 key-value형태로 가져올 수 있으며 방식은 아래와 같음
- mount로 전달하는 방식 -> file 형태로 전달
- env로 전달하는 방식 -> 환경변수로 전달
- Secret
- key - value 타입으로 데이터 저장
- 데이터가 BASE64로 인코딩된 ASCII Text가 저장 됨 (configMap과 다른점)
- Binary Data는 ASCII로 변환되어 BASE64로 인코딩되어 저장
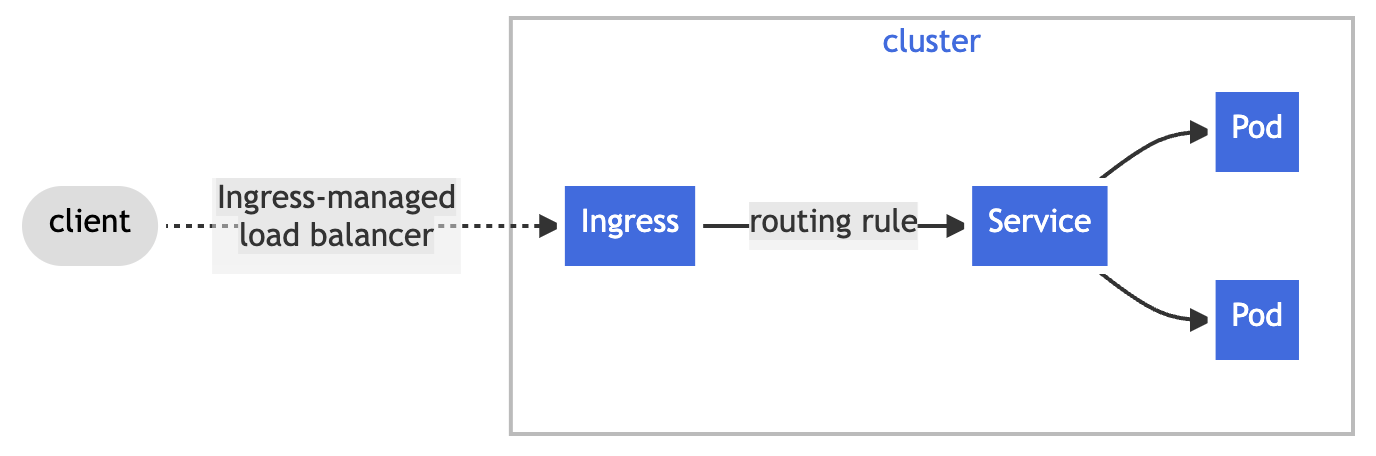
- Ingress
- 클러스터 외부에서 내부로 접근하는 요청들을 어떻게 처리할 지 정의해둔 규칙들의 모음
- 규칙들을 정의해둔 리소스를 Ingress라고 하며, 실제 규칙에 따라 처리하는 Ingress Controller가 존재
- 클러스터 외부에서 내부로 접근하는 요청들을 어떻게 처리할 지 정의해둔 규칙들의 모음
- 문서에 따르면 해당 기능들을 제공
- An Ingress may be configured to give Services externally-reachable URLs, load balance traffic, terminate SSL / TLS, and offer name-based virtual hosting.

- Persistent Volume(PV)
- Managing storage is a distinct problem from managing compute instances. The PersistentVolume subsystem provides an API for users and administrators that abstracts details of how storage is provided from how it is consumed. To do this, we introduce two new API resources: PersistentVolume and PersistentVolumeClaim
- 공식문서에 따르면 PV는 API 형태로 제공되며 PV와 PV Claim이라는 두 가지 API 리소스로 사용자에게 제공된다고 설명
- PV는 관리자가 프로비저닝하거나 Storage Class를 사용해 동적으로 프로비저닝한 클러스터의 스토리지
- Pod에 노드의 CPU, Memory와 같은 클러스터 리소스를 요청하는 것처럼 PV도 클러스터 리소스의 일종
- PV는 스토리지 시스템 등 스토리지 구현에 대한 정보, PV Claim은 해당 리소스에 대한 Claim 검사 역할로, PVC를 통해 쿠버네티스가 적절한 크기와 접근 모드의 PV를 찾고 할당함
- PVC: 디스크 요청 - size, access mode, storage class ... 요구 조건에 맞는 PV를 찾아 할당
- Storage Class
- Persistent Volume을 동적으로 프로비저닝할 때 사용되는 `provisioner`, `parameters`, `reclaimPolicy 필드를 포함
- aws-ebs로 스토리지 클래스를 프로비저닝할 것인지 등을 설정할 수 있음
- Role
- 특정 namespace에서만 작업할 수 있도록 제한된 권한 부여
- ClusterRole
- 클러스터 단위로 Role을 설정 -> 클러스터 내의 모든 namespace에 대해 Role이 설정되어 권한을 부여
- ServiceAccount
- 모든 동작중인 컨테이너에는 ServiceAccount가 부여
- 기본적으로 default 계정 사용
- 모니터링 컨테이너 또는 관리 컨테이너에 제한된 권한을 부여할때 사용
- label
- 쿠버네티스 오브젝트를 식별하기 위한 key/value 쌍의 메타정보
쿠버네티스 리소스를 논리적인 그룹으로 나누기 위해 붙이는 이름 - kubectl get pod -l env=pod
- 쿠버네티스 오브젝트를 식별하기 위한 key/value 쌍의 메타정보
- selector
- Label을 이용해 쿠버네티스 리소스를 필터링하고 원하는 리소스 집합을 구하기 위한 label query
Label을 이용해 쿠버네티스 리소스를 선택하는 방법(Label query) - kubectl get pod --selector env=prod,..
- Label을 이용해 쿠버네티스 리소스를 필터링하고 원하는 리소스 집합을 구하기 위한 label query
- taint
- taint를 설정한 노드에는 포드들이 스케줄링 되지 않음
- taint가 걸린 노드에 포드들을 스케줄링 하려면 toleration을 이용해서 지정해 주어야함
- taint는 cordon이나 draint처럼 모든 포드가 스케줄링 되지 않게 막는건 아니고, toleration을 이용한 특정 포드들만 실행하게 하고 다른 포드들은 들어오지 못하게 하는 역할을 함
- toleration
- taint를 설정한 노드에 pod들이 스케줄링 되기 위한 spec
- operator 설정으로 Exists, Equal이 있으며 Exists를 설정하면 taint key에 해당하는 value없이 노드에 스케줄링 가능 Equal은 key, value모두 같아야 함
- Node Affinity
- 노드 어피니티(Node Affinity)는 노드 셀렉터와 비슷하게 노드의 레이블을 기반으로 파드를 스케줄링
- 노드 어피니티와 노드셀렉터를 함께 설정할 수도 있으며, 이 때는 노드 어피니티와 노드셀렉터의 조건을 모두 만족하는 노드에 파드를 스케줄링 됨
- requiredDuringSchedulingIgnoredDuringExecution : 스케줄링하는 동안 꼭 필요한 조건preferredDuringSchedulingIgnoredDuringExecution : 스케줄링하는 동안 만족하면 좋은 조건 -> 꼭 이 조건을 만족해야하는 것은 아님
CKA 문제 30제
필요 명령어는 https://kubernetes.io/docs/home 에서 활용
Kubernetes Documentation
Kubernetes is an open source container orchestration engine for automating deployment, scaling, and management of containerized applications. The open source project is hosted by the Cloud Native Computing Foundation.
kubernetes.io
1. ETCD backup & restore
작업 시스템 : k8s-master

First, create a snapshot of the existing etcd instance running at https://127.0.0.1:2379, saving the snapshot to /data/etcd-snapshot.db .

Next, restore an existing, previous snapshot located at /data/etcd-snapshot-previous.db .

The following TLS certificates/key are supplied for connecting to the server with etcdctl:

CA certificate: /etc/kubernetes/pki/etcd/ca.crt

Client certificate: /etc/kubernetes/pki/etcd/server.crt

Client key: /etc/kubernetes/pki/etcd/server.key- docs에서 etcd backup을 검색하고 `Snapshot using etcdctl options`를 참고
- 명령어를 복사해오고 주어진 CA Certificate, Client cert, Client Key 파일을 넣어준다
- 저장위치를 지정해준다
ETCDCTL_API=3 etcdctl --endpoints=https://127.0.0.1:2379 \
  --cacert=<trusted-ca-file> --cert=<cert-file> --key=<key-file> \
  snapshot save <backup-file-location>

// 결과
Snapshot saved at /data/etcd-snapshot.db

// 확인
sudo ls -l /data/etcd-snapshot.db- 스냅샷 찍은 파일로 Restore하기
- 마찬가지로 docs에서 `Restoring an etcd cluster`를 참고
- <data-dir-location>을 etcd가 이제부터 사용할 데이터 저장소로 지정해준다 (현재 사용되고 있는 공간이 아닌 새로운 공간)
ETCDCTL_API=3 etcdctl --data-dir <data-dir-location> snapshot restore snapshot.db

// db 파일 풀린 것 확인
sudo tree /var/lib/etcd-new/

// hostPath 수정
sudo vi /etc/kubernetes/manifests/etcd.yaml
...
	- hostPath:
            path: /var/lib/etcd-new
            type: DirectoryOrCreate
        name: etcd-data

// Up 상태 확인
sudo docker ps -a | grep etcd- etcd pod에 Restore하고 앞으로 쓸 저장소가 어디인지 알려줘야 함
- pod는 static pod로 동작하므로 yml 파일을 수정해 적용한다
- /etc/kubernetes/manifests/etcd.yml
- 맨 아래에 name: etcd-data의 hostpath의 path를 수정
- 제대로 종료되고 실행되었는지 확인하기
- sudo docker ps -a | grep etcd
- exited 상태에서 Up상태로 변경되었는지 확인
- ssh를 종료하고, kubectl get pods를 통해 제대로 실행되었는지 확인하기
2. Pod 생성하기
클러스터: k8s
Create a new namespace and create a pod in the namespace.
    namespace name: ecommerce
    pod Name: eshop-main
    image: nginx:1.17
env: DB=mysql- 간단한 Pod 생성은 yml을 사용하기 보다 command를 사용해 만들 수 있도록 한다
// 클러스터 환경 변경하기
kubectl config use-context k8s

// namespace 만들기
kubectl create namespace ecommerce
// 잘 만들어졌는지 확인
kubectl get namespaces

// pod 만들기, dry-run을 통해 실행에 문제없는지 먼저 체크한다
kubectl run eshop-main --image=nginx:1.17 --env=DB=mysql --namespace=ecommerce --dry-run=client

// 결과: pod/eshop-main created (dry run)

// yaml로 결과 보기
kubectl run eshop-main --image=nginx:1.17 --env=DB=mysql --namespace=ecommerce --dry-run=client
 -o yaml

// pod 생성하기
kubectl run eshop-main --image=nginx:1.17 --env=DB=mysql --namespace=ecommerce

// 생성 확인하기
kubectl get pod --namespace ecommerce
// eshop-main 동작 중 확인- run 명령어를 통해 pod를 생성할 수 있음
- dry-run을 통해 생성 시 문제가 있는지 확인
- -o yaml 옵션을 통해 yaml로 생성 결과를 확인해보고 빠진 부분 없는지 체크할 수 있음
- docs를 활용한다면 kubectl run으로 검색하여 체크
3. Static Pod 생성하기
Configure kubelet hosting to start a pod on the node

TASK:
    Node: hk8s-w1
    pod Name: web
    image: nginx
- Static Pod를 생성하기 위한 yaml 파일을 작성해야하는데, 이를 dry-run과 -o 옵션을 통해 yaml 템플릿을 추출할 수 있음
// pod yaml 템플릿 생성하기
kubectl run web --image=nginx --dry-run=client -o yaml

apiVersion: v1
kind: Pod
metadata:
  creationTimestamp: null
  labels:
    run: web
  name: web
spec:
  containers:
  - image: nginx
    name: web
    resources: {}
  dnsPolicy: ClusterFirst
  restartPolicy: Always
status: {}
// Static Pod를 생성할 Node에 접속
ssh hk8s-w1

// 루트 권한으로 수행 (static pod 생성을 위함)
sudo -i

// static pod 위치 정보 확인 - kubelet 데몬이 사용하는 config 확인
cat /var/lib/kubelet/config.yaml

apiVersion: kubelet.config.k8s.io/v1beta1
authentication:
  anonymous:
    enabled: false
  webhook:
    cacheTTL: 0s
    enabled: true
  x509:
    clientCAFile: /etc/kubernetes/ssl/ca.crt
authorization:
  mode: Webhook
  webhook:
    cacheAuthorizedTTL: 0s
    cacheUnauthorizedTTL: 0s
cgroupDriver: systemd
clusterDNS:
- 10.96.0.3
clusterDomain: cluster.local
cpuManagerReconcilePeriod: 0s
evictionPressureTransitionPeriod: 0s
fileCheckFrequency: 0s
healthzBindAddress: 127.0.0.1
healthzPort: 10248
httpCheckFrequency: 0s
imageMinimumGCAge: 0s
kind: KubeletConfiguration
logging:
  flushFrequency: 0
  options:
    json:
      infoBufferSize: "0"
  verbosity: 0
memorySwap: {}
nodeStatusReportFrequency: 0s
nodeStatusUpdateFrequency: 0s
rotateCertificates: true
runtimeRequestTimeout: 0s
shutdownGracePeriod: 0s
shutdownGracePeriodCriticalPods: 0s
staticPodPath: /etc/kubernetes/manifests   // static Pod 경로 확인
streamingConnectionIdleTimeout: 0s
syncFrequency: 0s
volumeStatsAggPeriod: 0s

// 해당 위치에 yaml 파일을 생성하면 바로 static pod가 생성됨
cd /etc/kubernetes/manifests

cat > web-pod.yaml
apiVersion: v1
kind: Pod
metadata:
  name: web
spec:
  containers:
  - image: nginx
    name: web

// static pod가 실행중인지 확인

// root 권한 나가기
exit
// hk8s-w1 서버
exit

// pod확인, web이라는 pod name뒤에 -워커노드 이름이 붙음
kubectl get pods
NAME          READY   STATUS    RESTARTS   AGE
web-hk8s-w1   1/1     Running   0          50s
4. Multi-container Pod 생성하기
create pod

    작업 클러스터 : hk8s
    Create a pod name lab004 with 3 containers running: nginx, redis, memcached
- 한 Pod에 여러 Container가 존재하는 Pod를 생성하기
// pod yaml 템플릿 생성하기
kubectl run lab004 --image=nginx --dry-run=client -o yaml > multi.yaml

// nginx, redis, memcached container가 실행되도록 yaml 수정
vi multi.yaml

apiVersion: v1
kind: Pod
metadata:
  name: lab004
spec:
  containers:
  - image: nginx
    name: nginx
  - image: redis
    name: redis
  - image: memcached
    name: memcached

// pod 생성 - yaml로 실행하기는 apply -f (file)을 사용
kubectl apply -f multi.yaml

// pod 생성 확인 READY가 3/3으로 세 컨테이너가 pod 안에서 생성되었음
kubectl get pods
NAME     READY   STATUS    RESTARTS   AGE
lab004   3/3     Running   0          45s

// pod 상세 확인을 통해 3개의 컨테이너 생성 과정 확인
kubectl describe pod lab004

Name:             lab004
Namespace:        default
Priority:         0
Service Account:  default

...

Events:
  Type    Reason     Age   From               Message
  ----    ------     ----  ----               -------
  Normal  Scheduled  97s   default-scheduler  Successfully assigned default/lab004 to worker
  Normal  Pulling    97s   kubelet            Pulling image "nginx"
  Normal  Pulled     91s   kubelet            Successfully pulled image "nginx" in 5.42622008s
  Normal  Created    91s   kubelet            Created container nginx
  Normal  Started    91s   kubelet            Started container nginx
  Normal  Pulling    91s   kubelet            Pulling image "redis"
  Normal  Pulled     79s   kubelet            Successfully pulled image "redis" in 12.629671578s
  Normal  Created    78s   kubelet            Created container redis
  Normal  Started    78s   kubelet            Started container redis
  Normal  Pulling    78s   kubelet            Pulling image "memcached"
  Normal  Pulled     66s   kubelet            Successfully pulled image "memcached" in 11.935012071s
  Normal  Created    66s   kubelet            Created container memcached
  Normal  Started    66s   kubelet            Started container memcached
5. Side-car Containter Pod 실행하기
An existing Pod needs to be integrated into the Kubernetes built-in logging architecture (e.g. kubectl logs).
Adding a streaming sidecar container is a good and common way to accomplish this requirement.

Add a sidecar container named sidecar, using busybox image, to existing Pod eshop-cart-app

The new sidecar container has to run the following command: /bin/sh, -c, "tail -n+1 -F /var/log/cart-app.log

Use a volume, mounted at /var/log, to make the log file cart-app.log available to the sidecar container.

Don't modify the cart-app
- 문제 분석
- 현재 존재하는 Pod에 logging architecture로 구성되어있음
- sidecar container를 추가하고 싶고 해당 command를 추가해서 run하길 원함
- 볼륨 마운트는 /var/log를 하고, cart-app를 수정하면 안됨
// Pod 조회 - eshop-cart-app 확인
kubectl get pods eshop-cart-app

// yaml 템플릿 얻기
kubectl get pods eshop-cart-app -o yamle > eshop.yaml

// yaml 확인
vi eshop.yaml

apiVersion: v1
kind: Pod
metadata:
  name: eshop-cart-app
spec:
  containers:
  - command:
    - /bin/sh
    - -c
    - 'i=1;while :;do  echo -e "$i: Price: $((RANDOM % 10000 + 1))" >> /var/log/cart-app.log;
      i=$((i+1)); sleep 2; done'
    image: busybox
    name: cart-app
    volumeMounts:
    - mountPath: /var/log
      name: varlog
  volumes:
  - emptyDir: {}
name: varlog- sidecar 컨테이너 추가에 대한 방법은 공식문서를 참고한다
- `sidecar container with logging`으로 검색
// sidecar 컨테이너 부분 추가하기
  - name: count-log-1
    image: busybox:1.28
    args: [/bin/sh, -c, 'tail -n+1 -F /var/log/1.log']
    volumeMounts:
    - name: varlog
      mountPath: /var/log

// eshop.yaml에 해당 부분 추가
vi eshop.yaml

apiVersion: v1
kind: Pod
metadata:
  name: eshop-cart-app
spec:
  containers:
  - command:
    - /bin/sh
    - -c
    - 'i=1;while :;do  echo -e "$i: Price: $((RANDOM % 10000 + 1))" >> /var/log/cart-app.log;
      i=$((i+1)); sleep 2; done'
    image: busybox
    name: cart-app
    volumeMounts:
    - mountPath: /var/log
      name: varlog
  - name: sidecar
    image: busybox
    args: [/bin/sh, -c, 'tail -n+1 -F /var/log/cart-app.log']
    volumeMounts:
    - name: varlog
      mountPath: /var/log
  volumes:
  - emptyDir: {}
    name: varlog
- 기존 pod를 삭제한 후, yaml로 Pod를 새로 생성한 후 확인
// 기존 Pod 삭제 --force 옵션을 주면 빨리 삭제됨
kubectl delete pod eshop-cart-app --force

// yaml로 새로운 pod 생성
kubectl apply -f eshop.yaml

// pod 실행 및 컨테이너 개수 확인
kubectl get pod eshop-cart-app
NAME             READY   STATUS    RESTARTS   AGE
eshop-cart-app   2/2     Running   0          34s

// 로그 정보가 출력되는지 확인하기 -c는 컨테이너라는 옵션
kubectl logs eshop-cart-app -c sidecar

...
27: Price: 1547
28: Price: 380
6. Deployment & Pod Scale
문제 1. Pod scale out
작업 클러스터 : k8s

Expand the number of running Pods in "eshop-order" to 5
    namespace : devops
deployment : eshop-order- 해당 네임스페이스의 deployment가 최대 몇개의 pod까지 늘릴 수 있게 되어있는지 확인하고 주어진 조건에따라 5개까지 scale out할 수 있도록 설정
// 클러스터 설정을 위한 context 변경
kubectl config use-context k8s

// namespace 확인
kubectl get namesapces devops

// deployment 확인
kubectl get deployments.apps -n devops
// 출력, AVAILABLE이 2이므로 scale out replicas=2
NAME          READY   UP-TO-DATE   AVAILABLE   AGE
eshop-order   2/2     2            2           37d

// scale out (5개로 확장)
kubectl scale deployment eshop-order -n devops --replicas=5

// deployment 확인
kubectl get deployments.apps -n devops
NAME          READY   UP-TO-DATE   AVAILABLE   AGE
eshop-order   5/5     5            5           37d

kubectl get pods -n devops
NAME              READY   STATUS    RESTARTS   AGE
eshop-order-xxx   1/1     Running   0          18s
eshop-order-xxx   1/1     Running   0          18s
eshop-order-xxx   1/1     Running   0          37d
eshop-order-xxx   1/1     Running   0          18s
eshop-order-xxx 1/1 Running 0 37d- scale 명령어를 docs에 검색 (scaling a deployment or deployment scale command)
kubectl scale deployment/nginx-deployment --replicas=10
문제2. Deployment 생성하고 Scaling 하기
작업 클러스터 : k8s

Create a deployment as follows:
Task:
    name : webserver
    2 replicas
    label : app_env_stage=dev
    container name : webserver
    container image : nginx:1.14
Scale Out Depolyment
Scale the deployment webserver to 3 pods- k8s라는 클러스터에서 (Context) 요구하는 name, replicas, label, container name, image를 가지고 deployment를 생성한 후, replicas를 3으로 scale out 하라
// 컨텍스트 변경
kubectl config use-context k8s

// deployment yaml 템플릿 만들기
kubectl create deployment webserver --image=nginx:1.14 --replicas=2 --dry-run=client -o yaml > webserver.yaml

// yaml 수정하기 - labels, name을 수정
vi webserver.yaml

apiVersion: apps/v1
kind: Deployment
metadata:
  name: webserver
spec:
  replicas: 2
  selector:
    matchLabels:
      app_env_stage: dev
  template:
    metadata:
      labels:
        app_env_stage: dev
    spec:
      containers:
      - image: nginx:1.14
        name: webserver
        ports:
- containerPort: 80- deployment를 yaml 파일을 사용하여 생성하고 확인한 후 scale을 변경
// deployment 생성
kubectl apply -f webserver.yaml

// deployment 확인, pod 수, container, image, selector label 확인
kubectl get deployments.appls -o wide

// scale 확인
kubectl get pods
NAME                         READY   STATUS    RESTARTS   AGE
webserver-78f746b644-d8wks   1/1     Running   0          36s
webserver-78f746b644-zxvsp   1/1     Running   0          36s

// scale을 3개로 확장
kubectl scale deployment webserver --replicas=3

// 확인
kubectl get pods --show-labels
NAME                         READY   STATUS    RESTARTS   AGE   LABELS
webserver-78f746b644-d8wks   1/1     Running   0          95s   app_env_stage=dev,pod-templage-hash=78f746b644
webserver-78f746b644-djs8b   1/1     Running   0          24s   app_env_stage=dev,pod-templage-hash=78f746b644
webserver-78f746b644-zxvsp   1/1     Running   0          95s   app_env_stage=dev,pod-templage-hash=78f746b644
7. Rolling Update & Roll Back
작업 클러스터: k8s

Create a deployment as follows:
TASK:
    name : nginx-app
    Using container nginx with version 1.11.10-alpine
    The deployment should contain 3 replicas

Next, deploy the application with new version 1.11.13-alpine, by performing a rolling update

Finally, rollback that update to the previous version 1.11.10-alpine- 주어진 Task에 맞게 deployment 생성
// 컨텍스트 변경
kubectl config use-context k8s

// deployment 생성 yaml로 출력
kubectl create deployment nginx-app --image=nginx:1.11.10-alpine --replicas=3 --dry-run=client -o yaml

// 특별한 문제가 없다면 그대로 생성하기
kubectl create deployment nginx-app --image=nginx:1.11.10-alpine --replicas=3

// 확인하기 deployment, pod, replicaset 이름, 이미지
kubectl get deployments.app nginx-app
kubectl get pod | grep nginx-app

// container, image 버전 확인
kubectl describe pod nginx-app-id- Rolling Update 관련한 내용은 docs에 deployment rolling update로 검색하고, Deployments에 들어가서 updating deployment로 찾는다
- kubectl set image deployment <deployment명> <컨테이너명>=<컨테이너이미지(업데이트할)> --record=true
// 문제에서 요구하는 버전으로 Rolling Update 시행 (record 옵션을 통해 history를 남길 수 있음)
kubectl set image deployment nginx-app nginx=nginx:1.11.13-alpine --record=true deployments.apps/nginx-app image update

// 롤링 업데이트 상태 확인
kubectl rollout status deployment nginx-app
deployment "nginx-app" successfully rolled out

// 현재 상태의 pod 확인, bff47cd8c이라는 레플리카셋으로 교체 되었음
kubectl get pods | grep nginx-app
nginx-app-bff47cd8c-2cgsq   1/1   Running   0   3m15s
nginx-app-bff47cd8c-7pxxh   1/1   Running   0   3m13s
nginx-app-bff47cd8c-lssr9   1/1   Running   0   3m17s

// container, image 버전 확인하기
kubectl describe pod nginx-app-bff47cd8c-2cgsq

// record 옵션으로 기록을 했으므로 kubectl rollout history로 기록 확인
kubectl rollout history deployment nginx-app
REVISION   CHANGE-CAUSE
1          <none>
2          kubectl set image deployment nginx-app nginx=nginx=1.11.13-alpine --record=true

// 직전 버전으로 롤백 진행하기
kubectl rollout undo deployment nginx-app
deployment.apps/nginx-app rolled back

// 다시 pod 확인, describe로 이미지 버전확인
<생략>

// Rollout history 확인
kubectl rollout history deployment nginx-app
REVISION   CHANGE-CAUSE
2          kubectl set image deployment nginx-app nginx=nginx=1.11.13-alpine --record=true
3          <none>
8. NodeSelector
작업 클러스터 : kubectl config use-context k8s

- Schedule a pod as follows:

  . Name : eshop-store

  . Image : nginx

. Node selector : disktype=ssd- disktype=ssd인 노드를 찾아서 해당 pod를 실행하라
// 클러스터 컨텍스트 선택
kubectl config use-context k8s

// disktype이라는 label이 있는 node를 확인
kubectl get nodes -L disktype

// pod 실행하기 yaml 확인
kubectl run eshop-store --image=nginx --dry-run=client -o yaml

kubectl run eshop-store --image=nginx --dry-run=client -o yaml > eshop-store.yaml

// nodeselector 추가하기
vi eshop-store.yaml

apiVersion: v1
kind: Pod
metadata:
  name: eshop-store
spec:
  nodeSelector:
    disktype: ssd
  containers:
  - image: nginx
    name: eshop-store

 // pod 실행
 kubectl apply -f eshop-store.yaml

 // disktype=ssd label을 가진 node에서 pod가 실행되었는지 확인
 kubectl get pods -o wide eshop-store
 NAME          READY   STATUS    RESTARTS   AGE   IP          NODE                NOMINATED NODE   READINESS GATES
eshop-store   1/1     Running   0          11s   10.36.0.1   k8s-worker1         <none>           <none>
9. Node 관리
- 작업 클러스터 : k8s-worker1

. Set the node named k8s-worker1 as unavailable and reschedule all the pods running on it.- k8s-worker1 노드를 비우고, 해당 노드에 있는 파드들을 다른 노드로 이동시켜라
// k8s-worker1 노드에 존재하는 파드에 대한 정보 확인
kubectl get pods -o wide | grep k8s-worker1

// 노드를 비우고, 해당 노드에 있는 파드들을 다른 노드로 이동
kubectl drain k8s-worker1 --ignore-daemonsets --force
// 오류로 인해 특정 스토리지까지 삭제하도록 명령어 수정
kubectl drain k8s-worker1 --ignore-daemonsets --force --delete-emptydir-data

// pod들이 다른 노드로 잘 이동했는지 확인
kubectl get pods -o wide

// 해당 노드가 더 이상 schedule 받지 않는 상태임을 확인
kubectl get nodes
// Ready.SchedulingDisabled
10. Node 정보 수집
문제1
* Check Ready Nodes

  - Check to see how many nodes are ready (not including nodes tained NoSchedule) and
write the number to /var/CKA2022/RN0001- Ready상태인 노드들을 보여달라 (NoSchedule인 노드는 제외해라)
- Ready 상태인 노드의 수를 /var/CKA2022/RN0001에 기록해라
// -w word가 있는것만 보여달라는 옵션
kubectl get nodes | grep -i -w ready
hk8s-m     Ready    control-plane   122d   v1.25.4
hk8s-w1    Ready    <none>          122d   v1.25.4

// taints가 Noschedule인 것은 제외해야하므로 확인하기
kubectl describe node hk8s-m | grep -i NoSchedule
Taints:				node-role.kubernetes.io/master:NoSchedule

kubectl describe node hk8s-w1 | grep -i NoSchedule

kubectl describe node hk8s-w1 | grep -i taints
Taints:			<none>

echo "1" > /var/CKA2022/RN0001
문제2
* Count the Number of Nodes That Are Ready to Run Normal Workloads

  - Determine how many nodes in the cluster are ready to run normal workloads (i.e. workloads that do not gave any special tolerations).

Output this number to the file /var/CKA2022/NODE-Count- Ready 상태인 노드들의 수를 세서 저장하라
// ready 상태인 노드 확인, grep으로 출력, wc -l로 개수 출력 -> 파이프라인으로 바로 저장
kubectl get nodes | grep -i -w ready | wc -l > /var/CKA2022/NODE-count
cat /var/CKA2022/NODE-count
11. Deployment & Expose the Service
* 작업 클러스터 : kubectl config use-context k8s

Reconfigure the existing deployment `front-end` and `add a port specification named http` exposing port `80/tcp` of the existing container nginx.

Create a new service named `front-end-svc` exposing the container port http

Configure the new service to also expose the individual Pods visa a `NodePort` on the nodes on which they are scheduled- front-end라는 deployment에 존재하는 nginx 컨테이너에 80포트에 대한 exposing에 대해 http라고 naming을 해달라
- nginx에 대해서 80포트로 exposing해주고 있는 deployment에 http 이름을 붙여서 Reconfigure 해라
- front-end-svc 이름의 새로운 서비스를 만드는데, 기존 컨테이너 http라는 이름에 대해 서비스해야 한다
- 스케줄된 노드에 대해 NodePort로 http라는 이름의 컨테이너를 서비스하는 front-end-svc를 만들어라
// front-end deploy가 존재하는지 확인
kubectl get deployments.apps front-end
NAME          READY   UP-TO-DATE   AVAILABLE   AGE
front-end      2/2     2            2          37d

kubectl get deployments.apps front-end -o yaml > front-end.yaml

vi front-end.yaml

apiVersion: apps/v1
kind: Deployment
metadata:
  name: front-end
spec:
  replicas: 2
  selector:
    matchLabels:
      run: nginx
  template:
    metadata:
      labels:
        run: nginx
    spec:
      containers:
      - image: nginx
        name: http
        ports:	# 80포트에 대한 서비스 포트와 name 추가
        - containerPort: 80
          name: http

---
apiVersion: v1
kind: Service
metadata:
  name: front-end-svc
spec:
  type: NodePort	# Type 설정
  selector:
    run: nginx	# run: nginx인 Pod들을 묶어서 서비스해주겠다
  ports:
  - name: http
    protocol: TCP
    port: 80
targetPort: http # Pod의 containerPort name- Service를 구동시키기 위해 해당 yaml로 deploy를 다시 생성
kubectl delete deployments.apps front-end

kubectl apply -f front-end.yaml

// deploy 실행 확인
kubectl get deployments.apps front-end
NAME        READY   UP-TO-DATE   AVAILABLE   AGE
front-end   1/2     2            1           29s

// service 실행 확인
kubectl get svc front-end-svc
NAME            TYPE       CLUSTER-IP     EXTERNAL-IP   PORT(S)        AGE
front-end-svc   NodePort   10.96.119.45   <none>        80:31380/TCP   24s

// NodePort로 연결했을 때 서비스가 제대로 동작하는 지 확인
curl k8s-worker1:31380

<!DOCTYPE html>
<html>
<head>
<title>Welcome to nginx!</title>
<style>
html { color-scheme: light dark; }
body { width: 35em; margin: 0 auto;
font-family: Tahoma, Verdana, Arial, sans-serif; }
</style>
</head>
<body>
<h1>Welcome to nginx!</h1>
<p>If you see this page, the nginx web server is successfully installed and
working. Further configuration is required.</p>

<p>For online documentation and support please refer to
<a href="http://nginx.org/">nginx.org</a>.<br/>
Commercial support is available at
<a href="http://nginx.com/">nginx.com</a>.</p>

<p><em>Thank you for using nginx.</em></p>
</body>
</html>
- 컨테이너 포트에 대해서 이름을 붙여서 exporse 하는 서비스를 만드는 사용하는 예제가 docs에 나와있음
// 예제 코드
apiVersion: v1
kind: Pod
metadata:
  name: nginx
  labels:
    app.kubernetes.io/name: proxy
spec:
  containers:
  - name: nginx
    image: nginx:stable
    ports:
      - containerPort: 80
        name: http-web-svc

---
apiVersion: v1
kind: Service
metadata:
  name: nginx-service
spec:
  selector:
    app.kubernetes.io/name: proxy
  ports:
  - name: name-of-service-port
    protocol: TCP
    port: 80
    targetPort: http-web-svc
12. Pod Log 추출
작업 클러스터 : kubectl config use-context hk8s

- Monitor the logs of pod custom-app and: Extract log lines corresponding to error file not found Write them to /var/CKA2022/podlog.- Pod 안에는 Container, Container안에는 애플리케이션이 실행됨
- 애플리케이션의 Log를 Kubenetes의 Standard로 추출하는 문제
- custom-app이라는 pod가 있는데 pod의 로그를 모니터링한 후 file not found 메시지 line을 추출해서 저장하라
// 클러스터 이동
kubectl config use-context hk8s

// custom-app pod 확인
kubectl get pods custom-app
NAME          READY    STATUS    RESTARTS   AGE
custom-app     1/1     Running   0          50s

// 애플리케이션 log를 얻어옴
kubectl logs custom-app | grep 'file not found'
error: file not found
error: file not found
...

// error 로그를 저장
kubectl logs custom-app | grep 'file not found' > /var/CKA2022/podlog

// 저장되었는지 확인
cat /var/CKA2022/podlog
error: file not found
error: file not found
...- 쿠버네티스 스탠다드 로그를 보는 명령어
- kubectl logs <pod명>
13. CPU 사용량이 높은 Pod 검색
작업 클러스터 : kubectl config use-context hk8s

- From the pod label name=overloaded-cpu, find pods runnning high CPU workloads and
write the name of the pod consuming most CPU to the file /car/CKA2022/cpu_load_pod.txt.- CPU 사용량이 높은 순서로 Pod 확인하기
- 해당 Pod name을 제시된 경로에 기록
// 클러스터 이동
kubectl config use-context hk8s

// Pod CPU 사용량 확인
// 문제에 나온 label, cpu 사용 순 정렬 옵션
kubectl top pods -l name=overloaded-cpu --sort-by=cpu

// kubectl top nodes // node들의 CPU 사용량
echo "POD_NAME" > /var/CKA2022/cpu_load_pod.txt
Reference
https://kubernetes.io/docs/reference/kubectl/generated/kubectl_top/kubectl_top_pod/
# Examples

# Show metrics for all pods in the default namespace
kubectl top pod

# Show metrics for all pods in the given namespace
kubectl top pod --namespace=NAMESPACE

# Show metrics for a given pod and its containers
kubectl top pod POD_NAME --containers

# Show metrics for the pods defined by label name=myLabel
kubectl top pod -l name=myLabel
14. init 컨테이너를 포함한 Pod 운영
- init 컨테이너는 파드의 앱 컨테이너(main)들이 실행되기 전에 실행되는 특수한 컨테이너
- main 컨테이너를 실행하기 전에 실행되어야하는 환경구성, 설정, 스크립트, 설정 확인을 위한 컨테이너
- 항상 완료된 상태이어야 함, 결과가 True가 아니면 반복해서 init 컨테이너를 실행
Example Init containers in use
Init Containers
This page provides an overview of init containers: specialized containers that run before app containers in a Pod. Init containers can contain utilities or setup scripts not present in an app image. You can specify init containers in the Pod specification
kubernetes.io
apiVersion: v1
kind: Pod
metadata:
  name: myapp-pod
  labels:
    app.kubernetes.io/name: MyApp
spec:
  containers:
  - name: myapp-container
    image: busybox:1.28
    command: ['sh', '-c', 'echo The app is running! && sleep 3600']
  initContainers:	// 초기화 컨테이너가 모두 `완료`되면 main containers가 올라옴
  - name: init-myservice
    image: busybox:1.28
    command: ['sh', '-c', "until nslookup myservice.$(cat /var/run/secrets/kubernetes.io/serviceaccount/namespace).svc.cluster.local; do echo waiting for myservice; sleep 2; done"]
  - name: init-mydb
    image: busybox:1.28
    command: ['sh', '-c', "until nslookup mydb.$(cat /var/run/secrets/kubernetes.io/serviceaccount/namespace).svc.cluster.local; do echo waiting for mydb; sleep 2; done"]
문제풀이
작업 클러스터 : kubectl config use-context hk8s

- Perform the following
- Tasks:
 . Add an init container to web-pod(which has been defined in spec file /data/cka/webpod.yaml).
 . The init container should create an empty file named /workdir/data.txt.
 . If /workdir/data.txt is not detected the Pod should exit.
. Once the spec file has been updated with the init container definition, the Pod should be created.- 정의되어있는 yaml에 init container 추가
- init container에 빈 파일로 /workdir/data.txt 생성하는 커멘드 설정하기
- data.txt가 생성되지 않으면 종료되어야 하며 하나의 spec file에서 정의하고 생성되게 업데이트하라 (기존 yaml 이용해라)
# vi /data/cka/webpod.yaml
apiVersion: v1
kind: Pod
metadata:
  name: web-pod
spec:
  containers:
  - image: busybox:1.28
    name: main
    command: ['sh','-c','if [ !-f /workdir/data.txt ];then exit 1;else sleep 300;fi']
    volumeMounts:
    - name: workdir
      mountPath: "/workdir"
// init container 추가
  initContainers:
  - name: init
    image: busybox:1.28
    command: ['sh', '-c', "touch /workdir/data.txt"]
    volumeMounts:
    - name: workdir
      mountPath: "/workdir"
  volumes:
  - name: workdir
    emptyDir: {}


// pod 실행 시키기
kubectl apply -f /data/cka/webpod.yaml
// web-pod created

// pod 확인하기
kubectl get pods
...
web-pod 1/1 Running 0	8s

// pod에 접속하여 data.txt 생성 확인
kubcectl exec web-pod -c main -- ls -l /workdir/

-rw-r--r--    1 root     root             0 Mar 27 13:41 /workdir/data.txt
15. NodePort 서비스 생성
문제풀이
작업 클러스터 : kubectl config use-context k8s

- Task:
Create the service as type NodePort with the port 32767 for the nginx pod
with the pod selector app: webui- NodePort 타입의 서비스를 만들어라
- port = 32767
- service = nginx, app label = webui 인 Pod를 묶어서 서비스하는 NodePort 서비스 만들기
// 클러스터 이동
kubectl config use-context k8s

// label이 app=webui인 pod가 존재하는 지 확인
kubectl get pod --selector app=webui --show-labels
NAME                   READY   STATUS    RESTARTS   AGE   LABELS
nginx-5cfbcf5f65-cvw28   1/1     Running   0          10m   app=webui,pod-template-hash=5cfbcf5f65
nginx-5cfbcf5f65-j5qfz   1/1     Running   0          10m   app=webui,pod-template-hash=5cfbcf5f65

// nginx에서 어떤 포트를 쓰고 있는지 확인 (targetport 지정을 위함)
kubectl describe pod nginx-5cfbcf5f65-cvw28 -o yaml // 안나오면 기본포트

// NodePort Service Yaml 만들기 공식 문서 템플릿 사용
cat > myservice.yaml
apiVersion: v1
kind: Service
metadata:
  name: my-service
spec:
  type: NodePort
  selector:
    app: webui
  ports:
    - port: 80	// 내부 사용 포트
      targetPort: 80	// selector로 관리되는 Pod들의 port
      nodePort: 32767	// 외부에서 service 접근 Port

// NodePort service Pod 실행
kubectl apply -f myservice.yaml
service/myservice created

// NodePort Service 확인
kubectl get svc myservice
NAME	TYPE ..
myservice NodePort

// worker node 이름 확인
kubectl get node
NAME		STATUS	..
master		Ready
node01		Ready

// worker node에 curl로 작동 확인
curl node01:32767

<!DOCTYPE html>
<html>
<head>
<title>Welcome to nginx!</title>
<style>
    body {
        width: 35em;
        margin: 0 auto;
        font-family: Tahoma, Verdana, Arial, sans-serif;
    }
</style>
</head>
<body>
<h1>Welcome to nginx!</h1>
<p>If you see this page, the nginx web server is successfully installed and
working. Further configuration is required.</p>

<p>For online documentation and support please refer to
<a href="http://nginx.org/">nginx.org</a>.<br/>
Commercial support is available at
<a href="http://nginx.com/">nginx.com</a>.</p>

<p><em>Thank you for using nginx.</em></p>
</body>
</html>
Reference
포트 직접 선택하기
서비스
외부와 접하는 단일 엔드포인트 뒤에 있는 클러스터에서 실행되는 애플리케이션을 노출시키며, 이는 워크로드가 여러 백엔드로 나뉘어 있는 경우에도 가능하다.
kubernetes.io
apiVersion: v1
kind: Service
metadata:
  name: my-service
spec:
  type: NodePort
  selector:
    app.kubernetes.io/name: MyApp
  ports:
      # 기본적으로 그리고 편의상 `targetPort` 는 `port` 필드와 동일한 값으로 설정된다.
    - port: 80
      targetPort: 80
      # 선택적 필드
      # 기본적으로 그리고 편의상 쿠버네티스 컨트롤 플레인은 포트 범위에서 할당한다(기본값: 30000-32767)
      nodePort: 30007
16. ConfigMap 운영
문제풀이
작업 클러스터 : kubectl config use-context k8s

Expose Configuration settings
Task:
1. All operations in this question should be performed in the ckad namespace
2. Create a ConfigMap called web-config that contains the following two entries:
 - connection_string=localhost:80
 - external_url=cncf.io
3. Run a pod called web-pod with a single container running the nginx:1.19.8-alpine image, and expose these configuration settings as environment variables inside the container.- Config 정보를 Expose (노출하라)
- ckad namespace에서 모든 작업 시행
- ConfigMap이름은 web-config, 내용은 다음과 같음
- connection_string=localhost:80
- external_url=cncf.io
- pod 이름을 web-pod, nginx:1.19.8-alpine 버전으로 생성해 ConfigMap 변수를 env로 넣어라
// 클러스터 변경
kubectl config use-context k8s

// ckad namespace 확인 -> 없음
kubectl get namespaces ckad

// ckad namespace 생성
kubectl create namespace ckad

// ckad ns 확인
kubectl get namespaces ckad

// ConfigMap 생성 -n으로 ns 지정
kubectl create configmap web-config --from-literal=connection_string=localhost:80 --from-literal=external_url=cncf.io -n ckad

// 생성된 configMap 확인
kubectl get configmap -n ckad

// describe 확인
// -o yaml 옵션 가능
kubectl describe configmap -n ckad web-config

// web-pod.yaml 만들기
// --dry-run=client -o yaml 사용
kubectl run web-pod --image=nginx:1.19.8-alpine --port=80 --dry-run=client -o yaml > web-pod.yaml- web-pod.yaml까지 완성시켰다면, yaml로 pod를 만들기전에 configmap의 변수를 환경변수로 넣어줄 방법을 찾아야한다
공식문서예시를 보고 적용 (검색: configmaps envfrom)
- file을 통한 적용예시와 env로 적용하는 예시가 있으므로 구분하여 활용해야 하며 그 중 env 변수를 하나씩 전달하는게 아니라 configmap 전체를 전달하는 방식을 사용
// web-pod.yaml
apiVersion: v1
kind: Pod
metadata:
  name: web-pod
  namespace: ckad	# namespace명시
spec:
  containers:
  - image: nginx:1.19.8-alpine
  	name: web-pod
    envFrom:
    - configMapRef:
          name: web-config
	ports:
    - containerPort: 80

// web-pod 생성
kubectl apply -f web-pod.yaml

// pod 생성 확인
kubectl get pods -n ckad

// configmap의 값이 container의 환경변수로 적용되었는지 확인
kubectl exec -n ckad web-pod -- env
17. Secret 운영
문제풀이
Create a kubernetes secret and expose using a file in the pod.

1. Create a kubernetes Secret as follows:

- Name : super-secret

- DATA : password=secretpass

2. Create a Pod named pod-secrets-via-file, using the redis image, which mounts a secret named super-secret at /secrets.

3. Create a second Pod named pod-secrets-via-env, using the redis image, which exports password as PASSWORD- secret을 file을 사용해 pod에 pathing해라
- name: super-secret
- password=secretpass
- pod-secrets-via-file이름의 redis Pod를 생성하고 super-secret을 /secrets에 마운트
- pod-secrets-via-env이름의 redis Pod를 생성하고 PASSWORD에 Pathing
// 클러스터
kubectl config use-context k8s

// 어떤 데이터 타입이냐에 따라 command가 나뉘며 --help를 통해 확인
kubectl create secret --help
// 목적
docker registry
generic
tls

kubectl create secret generic super-secret \
--from-literal=password=secretpass

// secret 확인
kubectl get secrets

// 내용 확인하기 describe or get -o yaml
kubectl describe secrets super-secret
kubectl get super-secret -o yaml- Secret을 file로 mount하기 - docs 활용
// pod-secrets-via-file.yaml 생성

apiVersion: v1
kind: Pod
metadata:
  name: pod-secrets-via-file
spec:
  containers:
    - name: my-pod
      image: redis
      volumeMounts:
        # name must match the volume name below
        - name: foo
          mountPath: /secrets
          readOnly: true
  # The secret data is exposed to Containers in the Pod through a Volume.
  volumes:
    - name: foo
      secret:
        secretName: super-secret

// pod 생성
kubectl apply -f pod-secrets-via-file.yaml

// 생성 확인
kubectl get pod pod-secrets-via-file

// pod 내부 scret mount 확인
kubectl exec -it pod-secrtes-via-file -- ls /secrets
kubectl exec -it pod-secrtes-via-file -- cat /secrets/password
- Secret을 env로 적용하기 - docs활용
// pod-secrets-via-env.yaml 생성
apiVersion: v1
kind: Pod
metadata:
  name: pod-secrets-via-env
spec:
  containers:
  - name: my-pod
    image: redis
    env:
    - name: PASSWORD
      valueFrom:
        secretKeyRef:
          name: super-secret
          key: password

// pod 생성
kubectl apply -f pod-secrets-via-env.yaml

// env 확인
kubectl exec pod-secrets-via-env -- env- Secret을 file로 mount하는 방법
- 단일 variable의 경우 valueFrom
- 멀티 variables의 경우 configMap과 동일하게 envFrom을 활용
References
- Example: Provide prod/test credentials to Pods using Secrets
- Create a Pod that has access to the secret data through a Volume
- Define container environment variables with data from multiple Secrets
- Configure all key-value pairs in a Secret as container environment variables
18. Ingress
문제풀이
1. Applicaton Service 운영

 - ingress-nginx namespace에 nginx 이미지를 app=nginx 레이블을 가지고 실행하는 nginx pod를 구성하세요

 - 앞서 생성한 nginx Pod를 서비스하는 nginx service를 생성하시오

 - 현재 appjs-service는 이미 동작중입니다. 별도 구성이 필요 없습니다.

2. Ingress 구성

 - app-ingress.yaml 파일을 생성하여 다음 조건의 ingress 서비스를 구성하시오

  . ingress name: app-ingress

  . NODE_PORT:30080/ 접속했을 때 nginx 서비스로 연결

  . NODE_PORT:30080/app 접속했을 때 appjs-service 서비스로 연결

  . Ingress 구성에 다음의 annotations을 포함시키시오.

    annotations:

kubernetes.io/ingress.class: nginx- namespace를 확인하고, nginx Pod 생성
// 클러스터 변경
kubectl config use-context k8s

// namespace pod 확인
kubectl get pod -n ingress-nginx

// nginx pod 실행
kubectl run nginx --image=nginx --labels=app=nginx -n ingress-nginx # --dry-run=client -o yaml로 확인

// pod 생성 확인하기
kubectl get pod -n ingress-nginx

// nginx pod를 서비스하는 svc 생성
kubectl expose -n ingress-nginx pod nginx --port 80 --target-port=80

// svc 확인
kubectl get svc -n ingress-service

// nginx 서비스 내용 확인
kubectl describe service -n ingress-nginx nginx- Ingress yaml은 공식문서를 참고하여 생성한다 (검색: Ingress)
cat > app-ingress.yaml
apiVersion: networking.k8s.io/v1
kind: Ingress
metadata:
  name: app-ingress
  namespace: ingress-service
  annotations:
    nginx.ingress.kubernetes.io/rewrite-target: /
    kubenetes.io/ingress.class: nginx
spec:
  rules:
  - http:
      paths:
      - path: /
        pathType: Prefix
        backend:
          service:
            name: nginx
            port:
              number: 80
      - path: /app
        pathType: Prefix
        backend:
          service:
            name: appjs-service
            port:
              number: 80

// ingress 실행
kubectl apply -f app-ingress.yaml

// ingress 확인
kubectl get ingress -n ingress-nginx

// Rules 확인하기
kubectl describe ingress -n ingress-nginx app-ingress

// nodeport로 접속 확인하기
kubectl get nodes

curl k8s-worker1:30080/		# nginx

curl k8s-worker1:30080/app	# appjs
Reference
19. Persistent Volume(PV) 생성
문제풀이
kubectl config use-context k8s

Create Persistent Volume
 - Create a persistent volume with name app-config, of capacity 1Gi and access mode ReadWriteMany.
 - storageClass : az-c
- The type of volume is hostPath and its location is /srv/app-config- app-config 이름의 PV를 생성, 용량은 1G, Access Mode는 RWX
- Storage Class는 az-c이며 hostPath는 /srv/app-config
// 클러스터 변경
kubectl config use-context k8s

// 공식문서 활용 PV, hostPath (nfs 대신 hostPath로 변경)
cat > app-config-pv.yaml
apiVersion: v1
kind: PersistentVolume
metadata:
  name: app-config
spec:
  capacity:
    storage: 1Gi
  accessModes:
    - ReadWriteMany
  storageClassName: az-c
  hostPath:
    path: /srv/app-config

// pv 서비스 실행
kubectl apply -f app-config-pv.yaml

// pv 생성 확인
kubectl get pv
Reference
Persistent Volumes
This document describes persistent volumes in Kubernetes. Familiarity with volumes, StorageClasses and VolumeAttributesClasses is suggested. Introduction Managing storage is a distinct problem from managing compute instances. The PersistentVolume subsystem
kubernetes.io
20. Persistent Volume Claim(PVC)을 사용하는 Pod 운영
문제풀이
Application With Persistent Volume Claim

* Create a new PersistentVolumeClaim:
  Name: app-volume
  StorageClass: app-hostpath-sc
  Capacity: 10Mi
* Create a new Pod which mounts the PersistentVolumeClaim as a volume:
  Name: web-server-pod
  Image: nginx
  Mount path: /usr/share/nginx/html
* Configure the new Pod to have ReadWriteMany access on the volume.- PVC의 name, storage class, capacity 조건에 맞게 생성하라
- Pod를 만드는데 ReadWriteMany Access Mode로 PV를 할당 받기 원하므로 PVC의 Access Mode를 RWX으로 채움
// 클러스터 변경
kubectl config use-context k8s


// app-volume-pvc yaml 생성 - 공식문서 참고
cat > app-volume-pvc.yaml
apiVersion: v1
kind: PersistentVolumeClaim
metadata:
  name: app-volume
spec:
  accessModes:
    - ReadWriteMany
  resources:
    requests:
      storage: 10Mi
  storageClassName: app-hostpath-sc

// pvc 생성
kubectl apply -f app-volume-pvc.yaml

// pve 확인
kubectl get pvc

// pv 확인
kubectl get pv

# ACCESS MODE가 RWX, STORAGECLASS가 app-hostpath-sc인 PV를 찾고, STATUS가 bound인지 확인

// nginx pod 생성 -> pod add pvc 검색어를 활용
cat > web-server-pod.yaml
apiVersion: v1
kind: Pod
metadata:
  name: web-server-pod
spec:
  volumes:
    - name: mypd
      persistentVolumeClaim:
        claimName: app-volume
  containers:
    - name: nginx
      image: nginx
      ports:
        - containerPort: 80
      volumeMounts:
        - mountPath: "/usr/share/nginx/html"
          name: mypd

// 생성 및 확인하기
kubectl apply -f web-server-pod.yaml

kubectl get pod

kubectl describe pod web-server-pod
Reference
Persistent Volumes
This document describes persistent volumes in Kubernetes. Familiarity with volumes, StorageClasses and VolumeAttributesClasses is suggested. Introduction Managing storage is a distinct problem from managing compute instances. The PersistentVolume subsystem
kubernetes.io
Configure a Pod to Use a PersistentVolume for Storage
This page shows you how to configure a Pod to use a PersistentVolumeClaim for storage. Here is a summary of the process: You, as cluster administrator, create a PersistentVolume backed by physical storage. You do not associate the volume with any Pod. You,
kubernetes.io
21. Check resource Information
문제풀이
- List all 'PV's sorted by name saving the full kubectl output to /var/CKA2022/my_volumes.
- Use kubectl's own functionally for sorting the output, and do not manipulate it any further.- Persistent Volume을 name 순으로 sorted한 후 파일에 저장
- pod, 다른 api에 대한 문제가 나올 수 있음
- kubectl 명령만을 사용하여 output을 저장하여라
// 클러스터 변경
kubectl config use-context k8s

// pv를 name으로 정렬하여 데이터 저장-> 공식문서 cheet sheet 참고
// -A는 모든 namespace를 지정함
kubectl get pv -A --sort-by=.metadata.name > /var/CKA2022/my_volumes

// 리소스 확인하는 방법 yaml과 json으로 보면 자세히 확인할 수 있음
kubectl get pv -o yaml
kubectl get pv -o json
Reference
22. Kubenetes Upgrade
문제풀이
Cluster Upgrage - only Master

upgrade system : k8s-master
Given an existing Kubernetes cluster running version 1.22.4,
upgrade all of the kubernetes control plane and node components on the master node only to version 1.23.3.
Be sure to drain the master node before upgrading it and uncordon it after the upgrade.- k8s-master 클러스터의 k8s 버전이 1.22.4 -> 1.23.3으로 업그레이드
- 클러스터 업그레이드, 마스터, 워커 노드 업그레이드 유형이 나올 수 있음
- drain 후 upgrade를 진행하고 uncordon을 해라
업그레이드 해야할 구성 - Master(api, etcd, schduler, controller, ...), Worker1, Worker2
0. container engine(docker) 설치
[install -> update]
1. kubenetes 설치 툴: kubeadm
2. master, worker1, worker2 - kubelet, kubectl
systemctl start kubelet start
[kubeamd을 이용]
3. Master: kubeadm init
- API, Controller, Scheduler, etcd ... -> update
4. Worker: kubeadm join master
// kubenetes 업그레이드 과정 -> 공식문서 updating kubeadm 검색

// master로 이동
ssh k8s-master
sudo -i		# root 권한

1. Determine which version to upgrade to

# Find the latest 1.30 version in the list.
# It should look like 1.30.x-*, where x is the latest patch.
sudo apt update
sudo apt-cache madison kubeadm

2. kubeadm upgrade

# replace x in 1.30.x-* with the latest patch version
sudo apt-mark unhold kubeadm && \
sudo apt-get update && sudo apt-get install -y kubeadm='1.23.3-00' && \
sudo apt-mark hold kubeadm

// upgrade 확인
kubeadm version

kubeadm upgrade plan v1.23.3	# master component들 업그레이드 상태 확인

3. master의 components를 업그레이드
# replace x with the patch version you picked for this upgrade
sudo kubeadm upgrade apply v1.23.3

4. Drain the node: 마스터 노드에서 동작되는 pod를 모두 삭제 -> kubelet을 업그레이드 하기 위함

# console로 이동 (exit)
# replace <node-to-drain> with the name of your node you are draining
kubectl drain k8s-master --ignore-daemonsets
kubectl get nodes		# drain 작업이 됐는지 확인 SchedulingDisabled


ssh k8s-master
sudo -i

5. Upgrade kubelet and kubectl

# replace x in 1.30.x-* with the latest patch version
sudo apt-mark unhold kubelet kubectl && \
sudo apt-get update && sudo apt-get install -y kubelet='1.30.x-*' kubectl='1.23.3-00' && \
sudo apt-mark hold kubelet kubectl

// restart the kubelet
sudo systemctl daemon-reload
sudo systemctl restart kubelet

6. Uncordon the node : 마스터 노드에서 pod들이 다시 동작될 수 있게 변경

# console에서 진행
# replace <node-to-uncordon> with the name of your node
kubectl uncordon k8s-master
Reference
23. Kubenetes Troubleshooting(1)
문제풀이
Not Ready 상태의 노드 활성화
A kubernetes worker node, named kh8s-w2 is in state NotReady.
Investigate why this is the case, and perform any appropriate steps to bbring the node to a Ready state,
ensuring that any changes are mate permanent.- Not Ready 상태의 worker node가 있음
- Ready 상태가 될 수 있게 수정해라
worker node의 동작 원리
work node가 가지는 components
- dockerd : 컨테이너를 동작시켜주는 엔진
- kubelet : 클러스터를 운영해주는 역할
- kube-proxy : 쿠버네티스 환경에서 클라이언트 커넥션을 받아주는 역할(네트워크 구성)
worker 노드에는 다음 데몬이 동작중이어야 Ready 상태가 된다.
- dockerd running?
- 도커 데몬이 실행중어야 함
- kubelet running?
- kubelet 이 동작중이어야 함
- kube-proxy running?
- kube-proxy가 동작중이어야 함
- CNI running ?
- CNI(Container Network Interface)가 동작중이어야 함
// NotReady node 확인
kubectl get nodes
NAME	STATUS
hk8s-w2	NotReady

// worker node 접속
ssh hk8s-w2

// root 권한 얻기
sudo -i

// dockerd running?
systemctl status docker
...
active

// kubelet running?
...
inactive (dead)

// 현재 실행해주고 자동 load를 enable로 설정
systemctl enable --now kubelet

// console로 이동
exit
exit

// kube-system namespace에서 실행 중인 pod를 확인하면 kube-proxy와 CNI running을 확인
kubectl get pod -n kube-system -o wide
calico-node-		Running
...
kube-proxy-			Running


// 결과 확인
kubectl get nodes
24. Kubenetes Troubleshooting(2)
문제풀이
Not Ready 상태의 노드 활성화

A Kubernetes worker node, named hk8s-w2 is in state NotReady.
Investigate why this is the case, and perform any appropriate steps to bring the node to a Ready state,
ensuring that any chnages are made permanent.- hk8s-w2 worker node가 NotReady 상태
- worker node를 Ready 상태로 바꿔라
// 노드 상태 확인
kubectl get nodes
Name	STATUS
hk8s-w2	NotReady

// node 접속
ssh hk8s-w2

// root 권한 얻기
sudo -i

// docker running?
systemctl status docker
...
inactive

// 다음번 load부터는 자동으로 실행되게하며 지금 load하겠다
systemctl enable --now docker

systemctl status docker
...
active

systemctl status kubelet
...
active

// 나가서 상태 확인하기
exit
exit
kubectl get nodes
NAME	STATUS
hk8s-w2	Ready

// 서비스가 제대로 동작중인지 확인하려면 kube-proxy, CNI running 인지 확인하기
kubectl get pod -n kube-system -o wide
calico-node-	Running		hk8s-w2
kube-proxy-		Running		hk8s-w2
25. User Role Binding
문제풀이
Cluster : kubectl config use-context k8s

TASK:

Create the kubeconfig named ckauser.

- username : ckauser

- certificate location : /data/cka/ckauser.csr, /data/cka/ckauser.key

- context-name : ckauser

- kubernetes cluster must be operated with the privileges of the ckauser account.

Create a role named pod-role that can create, delete, watch, list, get pods.

Create the following rolebinding.

- name : pod-rolebinding

- role : pod-role

- user: ckauser- 클러스터: ckauser에서 ckauser라는 계정에 대해 role을 만들어 rolebinding 하라
- ckauser 컨텍스트는 ceritficate를 통해 생성하라
- role의 이름은 pod-role, pod에 대해 create, delete, watch, list, get 권한
- rolebinding 이름은 pod-rolebinding, pod-role을 cakuser에게 binding하도록 생성
// pod-role 생성하기 - 공식문서 참고 role binding or csr 검색
kubectl create role pod-role --verb=create,delete,watch,list,get --resource=pods

// 생성 확인
kubectl describe role pod-role

// role binding 생성하기
kubectl create rolebinding pod-rolebinding --role=pod-role --user=ckauser

// 생성 확인하기
kubectl descrie rolebinding pod-rolebinding

// user 정보를 가지고 context를 등록
// Add to kubeconfig
kubectl config set-credentials ckauser --client-key=/data/cka/ckauser.key --client-certificate=/data/cka/ckauser.csr --embed-certs=true

kubectl config set-context ckauser --cluster=kubernetes --user=ckauser

kubectl config use-context ckauser

// config 등록 확인
kubectl config view

// 클러스터 변경
kubectl config use-context ckauser

// 권한 확인
kubectl get pods

kubectl get service
Forbidden Error

// 원래 환경으로 되돌아가기
kubectl config use-config kubernetes-admin@kubenetes
Reference
26. User Cluster Role Binding
문제풀이
- Create a new ClusterRole named app-clusterrole which only allows to get,watch,list the following resource types: deployment, service.
- Bind the new ClusterRole app-clusterrole to the new user ckauser.
- User ckauser and ckauser clusters are already configured
- To check the results, run the following command: kubectl config use-context ckauser
// cluseter role 만들기 - 공식문서 RBAC 검색
kubectl create clusterrole app-clusterrole --verb=get,list,watch --resource=deployment,service
// 생성 확인
kubectl describe clusterrole app-clusterrole
// cluster role binding
kubectl create clusterrolebinding app-clusterrole-binding --clusterrole=app-clusterrole --user=cakuser
// 생성 확인
kubectl describe clusterrolebinding app-clusterrole-binding
// 클러스터 변경
kubectl config use-context ckauser
// 권한 확인
kubectl get service -A
kubectl get pod -A
Error Forbidden
Reference
Using RBAC Authorization
Role-based access control (RBAC) is a method of regulating access to computer or network resources based on the roles of individual users within your organization. RBAC authorization uses the rbac.authorization.k8s.io API group to drive authorization decis
kubernetes.io
27. ServiceAccount Role Binding
문제풀이
Create the ServiceAccount named pod-access in a new namespace called apps.
Create a Role with the name pod-role, and the RoleBinding named pod-rolebinding.
Map the Service Account from the previous step to the API resources Pods with the operations watch, list, get.
// namespace 생성
kubectl get namespaces apps
NotFound
kubectl create namespace apps
// serviceaccount 생성 - 공식문서 create serviceaccount
# Create a new service account named my-service-account
kubectl create serviceaccount pod-access -n apps
// 생성 확인
kubectl get sa -n apps
// pod-role 생성하기
kubectl create role pod-role --verb=get,watch,list --resource=pods -n apps
// 생성확인
kubectl describe role pod-role -n apps
// pod-role binding
kubectl create rolebinding pod-rolebinding --role=pod-role --serviceaccount=apps:pod-access --namespace=apps
// 생성확인
kubectl describe rolebinding pod-rolebinding -n apps
Reference
Using RBAC Authorization
Role-based access control (RBAC) is a method of regulating access to computer or network resources based on the roles of individual users within your organization. RBAC authorization uses the rbac.authorization.k8s.io API group to drive authorization decis
kubernetes.io
28. ServiceAccount Cluster Role Binding
문제풀이
- Create a new ClusterRole named deployment-clusterrole, which only allows to create the following resource types: Deployment StatefulSet DaemonSet
- Create a new ServiceAccount named cicd-token in the existing in the existing namespace apps.
- Bind the new Cluster Role deployment-clusterrole to the new ServiceAccount cicd-token, limited to the namespace apps.
// serviceaccount 생성
kubectl create serviceaccount cicd-token -namespace=apps
// cluster role 생성
kubectl create clusterrole deployment-clusterrole --verb=create --resource=deployment,statefulset,daemonset
// 생성 확인
kubectl describe clusterrole deployment-clusterrole
// clusterrole binding 생성
kubectl create clusterrolebinding deployment-clusterrole-binding --clusterrole=deployment-clusterrole --serviceaccount=apps:cicd-token
// 생성 확인
kubectl describe clusterrolebinding deployment-clusterrole-bindingReference
Using RBAC Authorization
Role-based access control (RBAC) is a method of regulating access to computer or network resources based on the roles of individual users within your organization. RBAC authorization uses the rbac.authorization.k8s.io API group to drive authorization decis
kubernetes.io
29. Kube-DNS
문제풀이
* Create a nginx pod called nginx-resolver using image nginx, expose it internally with a service called nginx-resolver-service.
* Test that you are able to look up the service and pod names from within the cluster. Use the image busybox:1.28 for dns lookup
 - Record result in /tmp/nginx.svc and /tmp/nginx.pod
 - pod: nginx-resolver created
 - Service DNS Resolution recorded correctly
- Pod DNS resolution recorede correctly- nginx를 이용해 nginx-resolver라는 pod를 생성 -> ip address 생성
- ip address를 expose해주는 service를 생성하라 - nginx-resolver-service
- busybox를 생성해서 service와 pod에 대한 lookup이 가능한지 확인
- /tmp/nginx.svc, nginx.pod에 결과를 저장
// nginx-resolver pod 생성
kubectl run nginx-resolver --image=nginx

// nginx-resolver-service를 expose
kubectl expose pod nginx-resolver --name nginx-resolver-service --port=80 --target-port=80

// ip address 확인
kubectl get pod nginx-resolver -o wide

// resolver-service의 ip 확인
kubectl get svc nginx-resolver-service

// busybox pod 생성 --rm -it 실행해서 동작하고 바로 종료, restart=Never로 파드가 종료될 떄 파드도 삭제되도록 함 -- /bin/sh로 프롬프를 띄워 nslookup 질의를 보낼 것
kubectl run --image=busybox:1.28 --rm -it --restart=Never -- /bin/sh

// /etc/resolv.conf에 dns 서버 정보(core dns)가 저장되어있음
Services: my-svc.my-namespace.svc.cluster-domain.example		- service_name.default.svc.cluster.local
Pods: pod-ipv4-address.my-namespace.pod.cluster-domain.example 	- 10-x-x-x.default.pod.cluster.local

// resolv.conf를 확인하여 dns 정보로 nslookup을 시행한다
cat /etc/resolv.conf

# nslookup nginx-resolver-service.default.svc.cluster.local
# nslookup ipAddress

# nslookup 10-x-x-x.default.pod.cluster.local

cat > /tmp/nginx.svc
Server:    10.96.0.10
Address 1: 10.96.0.10 kube-dns.kube-system.svc.cluster.local

Name:      nginx-resolver-service.default.svc.cluster.local
Address 1: 10.110.175.16 nginx-resolver-service.default.svc.cluster.local

cat > /tmp/nginx.pod
Server:    10.96.0.10
Address 1: 10.96.0.10 kube-dns.kube-system.svc.cluster.local

Name:      10-36-0-1.default.pod.cluster.local
Address 1: 10.36.0.1 10-36-0-1.nginx-resolver-service.default.svc.cluster.local
Reference
DNS for Services and Pods
Your workload can discover Services within your cluster using DNS; this page explains how that works.
kubernetes.io
30. Network Policy
문제풀이
- Create a new NetworkPolicy named allow-port-from-namespace in the existing namespace devops.
- Ensure that the new NetworkPolicy allows Pods in namespace migops to connect to port 80 of Pods in namespace devpos.
// migops, devops namespace에 대한 정보 확인하기
kubectl get namespace migops --show-labels
kubectl get namespace devops --show-labels
// namespace에 존재하는 pods 확인하기
kubectl get pod -n devops --show-labels
migops ---> ingress ---> devops
PODS PODS
team=migops port 80
app=web (labels)
cat > allow-port-from-namespace.yaml
apiVersion: networking.k8s.io/v1
kind: NetworkPolicy
metadata:
name: allow-port-from-namespace
namespace: devops
spec:
podSelector:
matchLabels:
app: web
policyTypes:
- Ingress
ingress:
- from:
- namespaceSelector:
matchLabels:
team: migops
ports:
- protocol: TCP
port: 80
kubectl apply -f allow-port-from-namespace.yaml
kubectl describe networkpolicies -n devops allow-port-from-namespaceReference