프로젝트를 진행하면서 Spring Security를 도입하여 JwtTokenFilter를 만들어 놓고 사용하면서 인증 및 인가, Method Security의 작동원리, 통합 테스트 진행 시 사용자 인증 등 내부적으로 사용자 인증이 어떻게 진행되는지 몰라 힘들었던 경험이 있어 작동원리를 알아보고 정리하도록 한다.
스프링 시큐리티 필터 작동원리는 이전 글 참고.
스프링 부트와 스프링 시큐리티 버전
- spring-boot:2.6.8
- spring-security-core:5.6.5
간단하게 우리 프로젝트에서 사용한 설정을 보면 @EnableWebSecurity 어노테이션을 사용하여 SpringSecurityFilterChain에 등록할 수 있고 SecurityFilterChain을 반환하는 filterChain을 커스텀하여 빈으로 등록하여 주면 FilterChainProxy의 filterChains에 올라갈 것이다.
@Configuration
@RequiredArgsConstructor
@EnableWebSecurity
@EnableMethodSecurity
public class SecurityConfig {
    private final JwtTokenProvider jwtTokenProvider;
    private final AccessDeniedHandler customAccessDeniedHandler;
    private final AuthenticationEntryPoint authenticationEntryPoint;
    private final OAuth2SuccessHandler oAuth2SuccessHandler;
    private final OAuth2UserServiceImpl oAuth2UserService;

    @Bean
    public BCryptPasswordEncoder passwordEncoder(){
        return new BCryptPasswordEncoder();
    }

    @Bean
    public AuthenticationManager authenticationManager(
            AuthenticationConfiguration authenticationConfiguration
    ) throws Exception {
        return authenticationConfiguration.getAuthenticationManager();
    }

    @Bean
    public SecurityFilterChain filterChain(HttpSecurity http) throws Exception{
        // csrf 비활성화 및 cors 설정
        http.csrf().disable()
                .cors();

        // header에 id, pw가 아닌 token(jwt)을 달고 간다. 그래서 basic이 아닌 bearer를 사용한다.
        http.httpBasic().disable()
                .authorizeRequests()// 요청에 대한 사용권한 체크
                .antMatchers("/**").permitAll()
                .and()
                .addFilterBefore(new JwtTokenFilter(jwtTokenProvider),
                        UsernamePasswordAuthenticationFilter.class);

        //세션 사용 X
        http
                .sessionManagement()
                .sessionCreationPolicy(SessionCreationPolicy.STATELESS)
                .and()
                .exceptionHandling()
                .accessDeniedHandler(customAccessDeniedHandler)
                .authenticationEntryPoint(authenticationEntryPoint);

        http.oauth2Login()
                .authorizationEndpoint()
                    .baseUri("/snslogin") // snslogin/{OAuthType}, Default baseUri : oauth2/authorization/{OAuthType}
                    .and()
                .userInfoEndpoint()
                    .userService(oAuth2UserService)
                    .and()
                .successHandler(oAuth2SuccessHandler);

        return http.build();
    }
프로젝트에서 사용되고 있는 Filter를 먼저 확인해보기 위해 FilterChainProxy에가서 getFilters에 디버깅을 해본다.
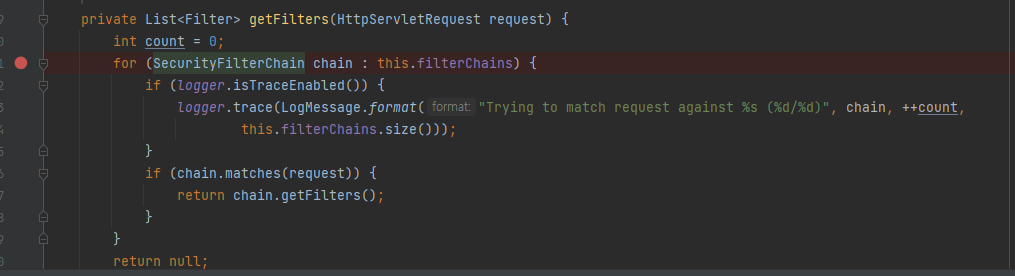
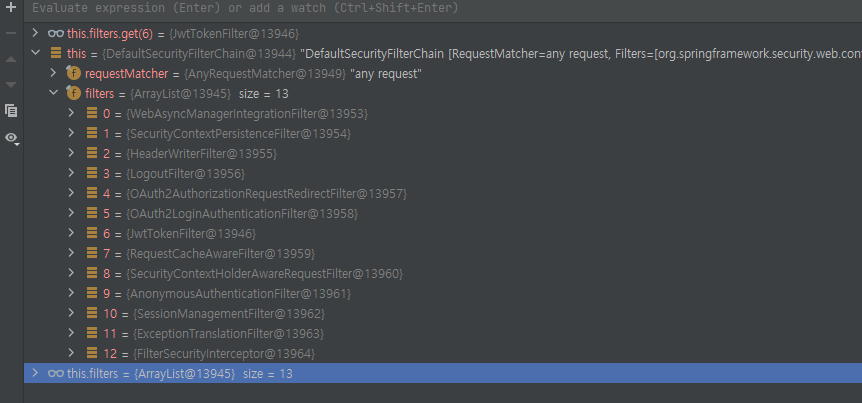
여기서 6번 필터를 보면 JwtTokenFilter라고 해서 우리가 Bean으로 등록한 Filter이고 Filter는 UsernamePasswordAuthenticationFilter앞에서 작동하도록 하였다.
간단히 프로젝트 상황을 설명했으니, 스프링 시큐리티에서 인증을 어떻게 진행하는지 알아보자.
Spring Security에서 인증과정
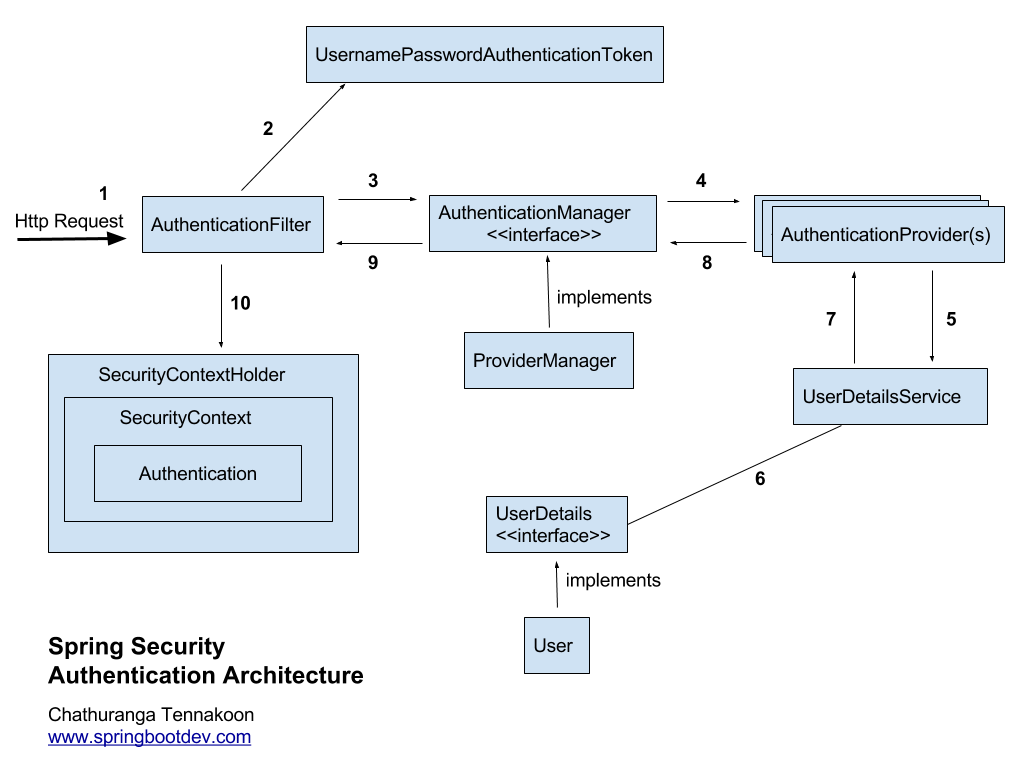
- 클라이언트로 부터 요청이 오면 인증 및 권한 부여 목적으로 필터를 거치게 된다.
- 일반적으로 Id, Password 기반의 인증일 경우 Authentication Filters라는 필터 뭉치에 도달하고, UsernamePasswordAuthenticationFilter를 통해 자격 증명을 기반으로 하는 UsernamePasswordAuthenticationToken(Authentication)을 생성한다.
- OAuth2.0이나 Jwt를 이용한 인증을 할 때는 인증 로직에 맞는 다른 필터를 거치게 된다.
- 생성된 UsernamePasswordAuthenticationToken(Authentication)을 가지고 AuthenticationManager (구현체인 ProviderManager)에게 인증을 진행하도록 위임한다.
- Token은 Authentication 인터페이스의 구현체(구조를 확인해보면 결국에 Authentication을 implements 하는 구조)이기 때문에 UsernamePasswordAuthenticationToken을 생성하면 Authenticaion를 생성하는 것이고 결국 Authentication 객체를 SecurityContext에 보관하는 것
- ProviderManager는 여러 AuthenticationProvider를 순회하면서 UsernamePasswordAuthenticationToken을 처리해줄 Provider를 찾는다.
- Provider는 authenticate(), supports() 메서드 등을 통해 인증 로직을 거치는데 여기에서 UserDetails를 생성해 User 정보를 가져오고 Authentication 객체를 생성한다.
- Provider에서 생성한 Authentication객체를 SecurityContextHolder 객체 안의 SecurityContext에 저장한다.
위의 과정을 걸쳐 Authentication 객체를 통해 Security 인증 filter를 통과
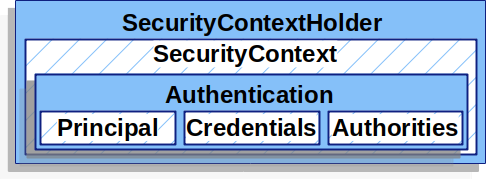
- 사용자의 인증 정보를 담은 Authentication객체가 있고 SecurityContext에 보관된다.
- Authentication 객체에는 Principal(UserDetails(주로 id))과 credential(주로 password), authorities(권한) 정보가 들어가며 이를 SecurityContext에 보관함.
- Security Context는 SecurityContextHolder에 있는 Thread Local에 저장되어 같은 스레드 내에서는 SecurityContextHolder를 통해 인증 정보에 접근할 수 있다.
JwtTokenFilter를 사용하는 실제 프로젝트에서 적용
JwtTokenFilter를 뜯어보면 어떻게 Jwt Token에 담긴 데이터로 Authentication과 UserDetails를 생성하고 Security Context에 올리는지 볼 수 있다.
JwtTokenFilter는 모든 요청에 대해 적용되며 UsernamePasswordAuthenticationFilter 앞에서 작동하도록 했다.

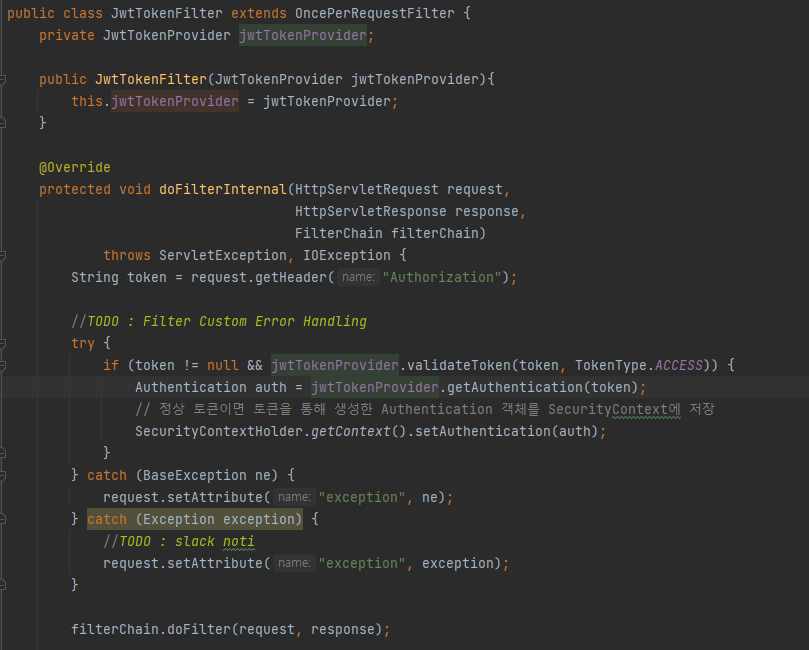
JwtTokenFilter
위에서 봤듯 Provider 구현체를 가지고 필터에서 검증을 한다.
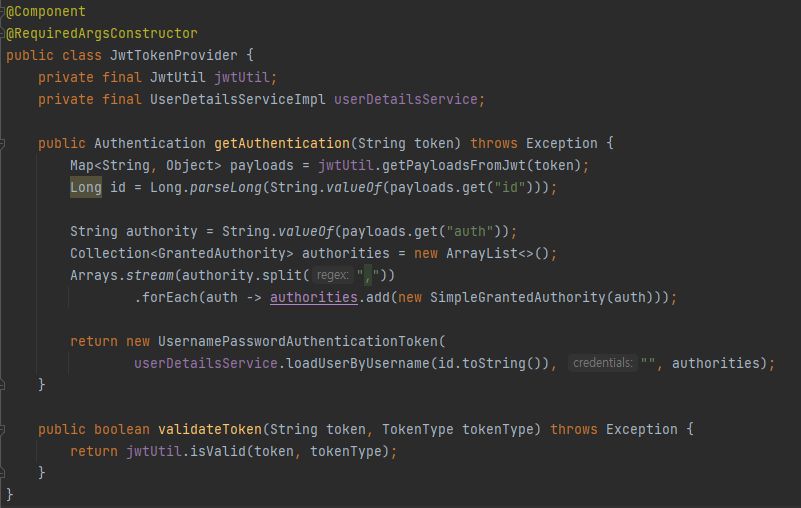
JwtTokenProvider
JwtTokenFilter에서 인증 방법
1. Jwt 토큰 검증
if (token != null && jwtTokenProvider.validateToken(token, TokenType.ACCESS))2. Payload에 담긴 데이터를 가지고 토큰의 authorities를 추출하여 UsernamePasswordAuthenticationToken 생성
Authentication auth = jwtTokenProvider.getAuthentication(token);

// getAuthentication메소드 일부
String authority = String.valueOf(payloads.get("auth"));
Collection<GrantedAuthority> authorities = new ArrayList<>();
Arrays.stream(authority.split(","))
       .forEach(auth -> authorities.add(new SimpleGrantedAuthority(auth)));

return new UsernamePasswordAuthenticationToken(
       userDetailsService.loadUserByUsername(id.toString()), "", authorities);
3. 생성된 UsernamePasswordAuthenticationToken (즉, Authenticaion객체)를 가지고 SecurityContextHolder에 담는다.
4. SecurityContextHolder에 있는 SecurityContext에서 authentication 객체를 꺼내어 사용자 정보, 권한을 가져다 쓸 수 있다.
Spring Security에서 통합 테스트 시 사용자 인증하는 방법
인증 단계에서 활용되는 Filter에 대해서 잘 알아봤다 간단히 정리를 하면!
Authentication 객체에 사용자 정보와 권한만 잘 담아서 Context에 올려주면 Security Filter를 잘 통과할 것이다.
Spring Security를 잘 모를 때 직접 주입해주는 방법을 활용했었지만
private void testLogin(UserEntity user) throws Exception {
   UserDetails userDetails = new CustomUserDetails(user.getId());
   UsernamePasswordAuthenticationToken auth = new  UsernamePasswordAuthenticationToken(userDetails, "", userDetails.getAuthorities());
   SecurityContextHolder.getContext().setAuthentication(auth);
}
-> 사용자의 인증 레벨에 따라 시큐리티에서 제공하는 어노테이션을 활용하면 된다.
User를 mock해오는 @WithMockUser(name, role 등 설정 가능)
- @WithMockUser 사용 option으로 username, password, roles 설정 가능하지만 우리는 UserDetails에서 name으로 찾는 것이 아닌 id로 찾기 때문에 사용할 수 없다
- Security에 대해 좀 잘 알았더라면 설계를 잘 진행했을텐데라는 생각이..
- 우리는 대부분의 서비스에서 getLoginUser를 사용하고 getLoginUser를 보면
@Override
public UserEntity getLoginUser() throws Exception {

   Long userId = ((CustomUserDetails) SecurityContextHolder
           .getContext()
           .getAuthentication()
           .getPrincipal())
           .getId();

   return getUserById(userId);
}
SecurityContext에 Authentication 객체에서 Id를 얻어와 findById로 UserEntity를 조회한다. 하지만 WithMockUser는 가짜 유저이기 때문에 Security Context에서 읽어오면 문제 발생 (사용자 인증 정보를 가져오는 3가지 방법 정리)
따라서 누구인지 중요하지 않고 로그인한 사용자라는 것만 필요하다면 WithMockUser를 사용하는 게 좋다.
프로젝트에 적용된 방법은 Authenticaion 객체를 가져오는 방식 중 Security Context Bean에 접근하여 가져오는 방법이고 대부분 서비스에서 호출되고 있음
내 생각으로는 Controller에서 authentication 객체를 받아 userRepository에서 find하는 방식으로 하면 mocking이 편하고 서비스단에서 로그인 체크를 하는 게 아니라 온전히 Filter에서 처리할 수 있고 Username이나 id 정도를 넘겨주면 서비스-리포에서 처리 가능-> 서비스 Test에서 로그인 체크를 안 하게 되어서 좋다? Security context에 Authentication객체를 안 올리고 테스트할 수 있어서 편하다? 정도로 정리가 되었다..
실제 데이터를 UserDetails로 가지고 오는 @WithUserDetails(value=”id”)
- value에 id값을 넣어주면 id에 해당하는 유저 정보를 CustomUserDetails에 넣어준다.
- 우리는 UserDetails에서 authorities를 관리하지 않기 때문에 권한체크가 필요한 테스트에서 사용이 불가능하다.
- Authorities를 Details에서 관리하지 않는다면 권한체크를 할 때 사용할 수 없음!!
- 권한 체크 없이 DB에 있는 특정 사용자를 주입하기엔 좋은 듯하다.
원하는 인증 데이터를 Context에 올릴 수 있도록 직접 custom 어노테이션 @WithMockCustomUser 만들기
- 내 생각으로는 제일 커스텀하기 편한 방법 같다 사용 권장!
- Authenticaion 객체를 직접 만드는데 Custom 하게 만들 수 있어서 재사용에 편리하고 우리 프로젝트에 맞게 설정할 수 있어서 좋다.
- 특히 권한 체크 부분에서 우리는 ADMIN이면서, NORMAL 기능을 사용해야 할 때 String을 split 하는 방식으로 주입하기 때문에 Filter에서 로직을 짜 처리를 해놨고 테스트 환경에서는 어떻게 주입해야 할지 애매했다.
// WithMockCustomUser interface
@Retention(RetentionPolicy.RUNTIME)
@WithSecurityContext(factory = WithMockCustomUserSecurityContextFactory.class)
public @interface WithMockCustomUser {
   String id() default "5";

   UserType role() default UserType.ROOT;
}

//WithMockCustomUserSecurityContextFactory.java
public class WithMockCustomUserSecurityContextFactory implements WithSecurityContextFactory<WithMockCustomUser>{
   @Override
   public SecurityContext createSecurityContext(WithMockCustomUser annotation) {
       final SecurityContext securityContext = SecurityContextHolder.createEmptyContext();

       UserDetails userDetails = new CustomUserDetails(Long.valueOf(annotation.id()));

       Collection<GrantedAuthority> authorities = new ArrayList<>();
       Arrays.stream(annotation.role().getUserType().split(","))
               .forEach(auth -> authorities.add(new SimpleGrantedAuthority(auth)));

       final UsernamePasswordAuthenticationToken authenticationToken
               = new UsernamePasswordAuthenticationToken(userDetails,
               "",
               authorities);

       securityContext.setAuthentication(authenticationToken);
       return securityContext;
   }
}- @WithMockCustomUser를 사용하면 우리의 UserType으로 role을 설정할 수 있고 user도 id로 얻어올 수 있게 설정할 수 있다.
Controller 테스트 예시 (우리 프로젝트는 hasrole method security를 사용하여 권한 체크가 필요하기 때문에 WithUserDetails로는 통과되지 않는다.)
   @DisplayName("공지, FAQ Post를 작성하면, Post를 저장한다.")
   @Test
//    @WithMockUser(username = "admin", roles = {"NORMAL"})
//    @WithUserDetails(value = "5")
   @WithMockCustomUser
   void givenPostInfo_whenWritePost_thenCreatePost() throws Exception {
       String title = "title";
       String content = "content";
       BoardType boardType = BoardType.NOTICE;

       mockMvc.perform(post("/post")
               .contentType(MediaType.APPLICATION_JSON)
               .content(objectMapper.writeValueAsBytes(PostEntity.builder()
                       .title(title)
                       .content(content)
                       .boardType(boardType)
                       .build()))
               ).andDo(print())
               .andExpect(status().isOk());
   }
OAuth2.0을 적용하기 전에 분명 헷갈릴 수 있는 부분이었는데 따로 자세히 정리한 적이 없어서 정리하고 팀에 공유하도록 했다.. Security 이 정도면 어느 정도 이해했다고 할 수 있을 것 같다!!
'트러블슈팅' 카테고리의 다른 글
| SSL/TLS 설정 시 Cipher Suites 설정 (0) | 2023.04.20 |
|---|---|
| 3-cert-chain 인증서 만들기 (0) | 2023.04.18 |
| Tomcat 재기동 시 에러 (0) | 2023.02.01 |
| Spring Security와 CORS 에러 대응 (0) | 2023.01.03 |
| Swagger에서 CORS에러 해결 (0) | 2022.11.13 |


